
Overview
The windscreen wiper mechanism can become clogged up with rust and gunk either slowing the wiper action or stopping the wipers from moving at all. This project tells you how to clean up the parts which will free the wipers and allow them to work correctly.
Tools required
- 22mm spanner
- 10mm & 13mm sockets
- star drive
- Patience!
Parts
- Grease
- Hammerite paint
- Waxoil
Warning
It is VERY easy to scratch the paintwork on this job. Make sure you cover up the bonnet etc beforehand
Steps
- Undo the nuts holding the windscreen wipers and remove both wiper arms.
- Undo the large 22mm nuts holding the drive spindles for the wipers through the body. [These may well need freeing up with WD40 if the water has caused corrosion in this area]. It is easy for the spanner to slip and scratch the paint here so take care.
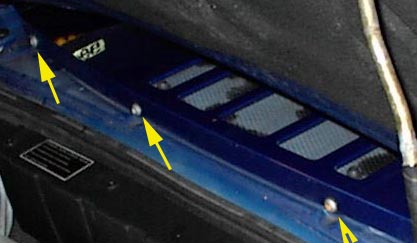
- Undo the 6 “star drive” bolts that hold the front valance in place (4 in the front, 1 either side of door-shuts) and remove the front valance. (You have the choice of either leaving the valance upside down on the suitably protected bonnet or disconnecting the water-washer hose (probably need a heat-source to soften it up) and removing and storing the valance somewhere safe)
- Once the valance is removed, the whole wiper mechanism is exposed. Liberal amounts of grease on all connections may solve your problem of “juddering” or slow wiping. (I use spray Commer grease to get into all the joints). If that is the case, you will soon find out by turning on the ignition and operating the wipers. If the motor turns smoothly and the mechanism is good at all speeds, then simply refit the valance and thank your lucky stars! If grease does not solve your problems, then proceed to taking out the motor as below.
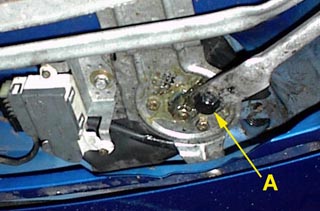
- Start by undoing the 13mm nut ‘A’ that secures the wiper mechanism to the centre of the motor and freeing up the wiper mechanism. If you then undo the four 10mm nuts that hold the wiper mechanism to the car body at the bottom of the windscreen, the whole mechanism can be lifted out in one piece.
- CAUTION. You have now upset the position of the, park (initial wiper position), mechanism. Take special care when re-installing as detailed below
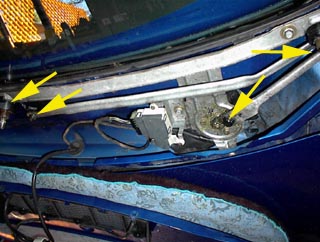
Next undo the devices that hold the motor in place. One is a 10mm nut located on the motor body; the other is a star-drive bolt located on the front car body (need the bonnet open to reach it). You will also have to disconnect one electrical connector and then lift out the whole of the motor. (Use this opportunity to ensure the drain-hole in the body under the motor is clear and no rust has started there)
- Hold the motor in a vice or similar, carefully strip off the rubber glove and inspect motor body. If the motor body is badly rusted as mine was, wire-brush and paint with Finnigans Hammerite or similar. [I used black waxoil on top of the paint in an effort to stop further rusting.]
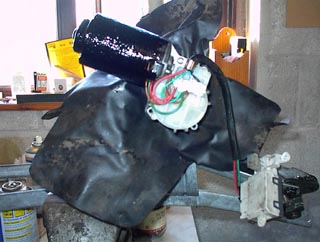
- Then undo the 2 alan screw bolts on the top of the motor case and withdraw top part of motor carefully. Check the roller bearing is well greased and turning feely. Grease if necessary. (I then sprayed some WD40 inside the motor to keep all intact.) Photo shows motor painted, ready to re-install the rubber ³glove² around it.
When reinstating in the car, fit the motor first and then the wiper linkage to the motor. Do not fit the valance yet. Fitting is the reverse of dismantling EXCEPT as mentioned earlier, you have upset the ‘parking position’ for the wipers.
To overcome this problem do not refit the arm with nut ‘A’ shown earlier. Instead, once the motor and all linkage mechanism are re-fitted, turn the wipers on and off to make sure the motor is in ‘parked’ position. Then, using sticky tape on the ends of the drive shafts in lieu of re-fitting the wiper blades, offer the linkage up to the motor drive and trial-fit with nut ‘A’. Then try the wipers again, watching the sticky tape to ensure the wipers don’t ‘kick down’ before starting the upward sweep. Re-adjust linkage as necessary until you are sure the wipers just move upwards. The object of this exercise is ensure that the linkage is aligned to the motor in such a way that the wiper blades won’t ‘kick down’ when you first switch them on (and scratch the valance when they do)
Once you are satisfied you have it right, remove sticky tape, make sure all is tight and then refit valance (don¹t forget washer hose if you removed it) and wiper blades. When re-fitting the valance, it is worth putting liberal amounts of grease between the drive spindles and the valance in an effort to slow water ingress to this area.
Test and go and have a beer or six on the money you just saved. (A new motor is about £160 plus fitting costs!)
This technical guide was originally held at http://www.fiatbarchetta.com/btech/wipemot.html. It was copied to this site in 2021 to ensure its availability and to reformat it into a more modern layout. The original guide was written by Ricky Reid
